Howto customize Roundcube webmail for your service
Reading time: 5 minutes
Providing email services to your customers or even your own company is an import part of communication. Also, it is important to brand your service and this way also adds some additional trust for your users. Roundcube Support pleases admins to customize their installation, so the people don’t contact Roundcube project for support.
Select the right skin
Selecting the right skin for your users is a hard task. Even if the webmail services you provide, are only for one company. Dependent on your users you have to decide, how the webmail should look like.
Currently, we @qameta use Larry skin for most of our customers because they got used to it and this is the default theme for Roundcube. But if your users are used to Classic skin, you can allow them to switch to another skin through the settings page.
Customize with your Logo
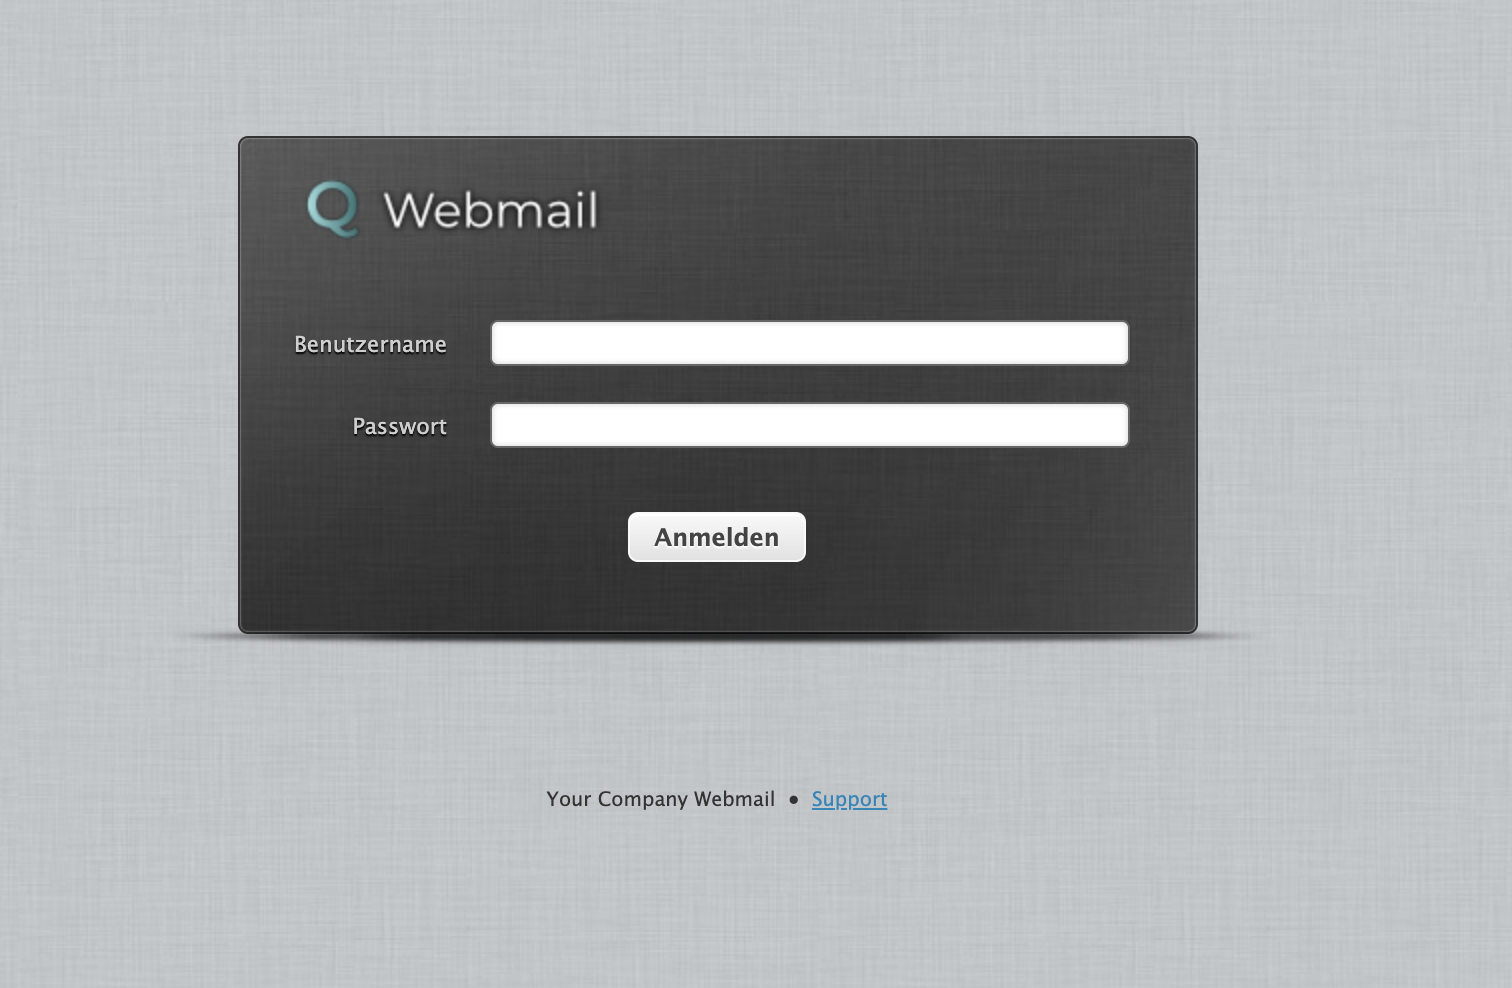
The second step for me would be to replace the Roundcube logo with my logo. This will improve your service brand and add trust to your webmail service. Your users should know your company and therefore your logo.
The most simple way is to grab the current logo from your webmail page and replace the image by editing it. But you can use the current logo from github project page:
$ wget https://github.com/roundcube/roundcubemail/raw/master/skins/larry/images/roundcube_logo.png
Sometimes it is easier to simply start with an empty image. The params below were taken from current (2020-12-29) repository logo:
- width: 177
- height: 49
- background: transparent
- image format: PNG
You can use Imagemagick to create such an image:
$ convert -size 177x49 xc:"rgba(0,0,0,0)" PNG32:webmail_logo.png
Add your logo and maybe some text if there is enough space left. I’ve added Webmail to reflect the service.
Now you have several possibilities to change the logo. If you have installed Roundcube from the project website, there is a config/ folder:
# TODO: change this to the
# right folder
cd /var/www/webmail/
cd config/
If you use Roundcube from Debian project the configuration files are in folder /etc/roundcube/:
cd /etc/roundcube/
In the config/ folder you will find a config.inc.php. Below the default skin definition add your logo:
<?php

// skin name: folder from skins/
$config['skin'] = 'larry';
$config['skin_logo'] = 'https://your-company.com/images/webmail_logo.png';
This should be the best solution, as you can update your webmail and your skins any time and the skin logo will be replaced by configuration.
You can even setup different logos for different skins. Take a look at config/defaults.inc.php:
<?php

// Logo image replacement. Specifies location of the image as:
// - URL relative to the document root of this Roundcube installation
// - full URL with http:// or https:// prefix
// - URL relative to the current skin folder (when starts with a '/')
//
// An array can be used to specify different logos for specific template files
// The array key specifies the place(s) the logo should be applied to and
// is made up of (up to) 3 parts:
// - skin name prefix (always with colon, can be replaced with *)
// - template name (or * for all templates)
// - logo type - it is used for logos used on multiple templates
//   the available types include '[favicon]' for favicon, '[print]' for logo on all print
//   templates (e.g. messageprint, contactprint) and '[small]' for small screen logo in supported skins
//
// Example config for skin_logo
/*
   array(
     // show the image /images/logo_login_small.png for the Login screen in the Elastic skin on small screens
     "elastic:login[small]" => "/images/logo_login_small.png",
     // show the image /images/logo_login.png for the Login screen in the Elastic skin
     "elastic:login" => "/images/logo_login.png",
     // show the image /images/logo_small.png in the Elastic skin
     "elastic:*[small]" => "/images/logo_small.png",
     // show the image /images/larry.png in the Larry skin
     "larry:*" => "/images/larry.png",
     // show the image /images/logo_login.png on the login template in all skins
     "login" => "/images/logo_login.png",
     // show the image /images/logo_print.png for all print type logos in all skins
     "[print]" => "/images/logo_print.png",
   );
*/
$config['skin_logo'] = null;
Attention: Replacing logo images in the skin folder adds additional steps on updating Roundcube or even skin, as you have to replace the logo after an update over and over again. Check the configuration file to reduce your error rate.
Add your support URL
As most users know the URL for their webmail service, they often don’t know who is responsible for support. Please add a support URL as you provide this service, you are responsible for support. This is an important thing Roundcube Support is asking us for.
This can be done through config.inc.php file:
<?php

// provide an URL where a user can get support for this Roundcube installation
// PLEASE DO NOT LINK TO THE ROUNDCUBE.NET WEBSITE HERE!
$config['support_url'] = 'https://your-company.com/support/';
It’s up to you to point the URL to a ticket system or some special support page with contact information. The homepage would be a good starting point too.
Your service should have a name
As you provide email and webmail service, it should have a name. This can be defined in config.inc.php too:
<?php

// Name your service. This is displayed on the login screen and in the window
// title
$config['product_name'] = 'Your Company Webmail';
Professional Setup
As you provide professional services and the configuration file is PHP code, you can move all the customization to a separate file and include it in config.inc.php by overwriting the values you need in a separate file we will call customize.inc.php:
Simply add it at the bottom of your config.inc.php
<?php

// Add to the bottom to replace variables set:
include_once("/etc/roundcube/customize.inc.php");
Do all your changes in this separate file so you know what you have changed:
<?php

$config['skin_logo'] = 'https://your-company.com/images/webmail_logo.png';
$config['support_url'] = 'https://your-company.com/support/';
$config['product_name'] = 'Your Company Webmail';
Take a look at config/defaults.inc.php for more customization options.
Summary
Through customizing your Roundcube webmail installation for your email hosting, you can improve communication. A customized service adds trust for your service by having recognizable parts your customers will trust and direct access to your support.
Using a separate configuration file improves the update process and reduces accidental replacements of your setup.
I hope this will help you deliver better email and Roundcube webmail services to your company or your customers.