Monitoring your Local Postfix Blacklist with Munin
Reading time: 7 minutes
You have built your local IP blacklist for Postfix. Invested time to analyze server logs or Rspamd history to blacklist single hosts, IP addresses, or even whole networks. But how well is it working compared to public blacklists you are using? Time to see the results and get some visual insights through Munin Monitoring System.
Setup your blacklist for Munin
First of all, you have to decide how to visualize the data in your graph. There are different solutions you can approach. You may want so kind of overview, to see how many hits your blacklist has. Maybe you want to monitor or compare the results to public or payed blacklists you are using.
Display by hits
The most simple one is to compare your blacklist against other public blacklists. To achieve this, you have to make every block text of your blacklist look something like:
root@server $ cat /etc/postfix/my_blacklist
192.168.42.1           REJECT blocked by mail.local
192.168.43.0/24    REJECT blocked by mail.local
mail.spamdomain.example blocked by mail.local
We will use the text “blocked by mail.local” and, in particular, mail.local to display the hits of our local blacklist. The starting words “blocked by” are essential because the Munin plugin uses them to filter for blacklist (RBL) entries.
HINT: For more details on how to create your own blacklist, check: Blacklisting Single Hosts, IP Addresses, and even Networks in Postfix.
Separate Results by Host, IP Address and Networks
If you have a good reason to list the different block methods (hostname, IP address, or network) in the graph, you can separate them this way:
root@server $ cat /etc/postfix/my_blacklist
192.168.42.1           REJECT blocked by ip.mail.local
192.168.43.0/24    REJECT blocked by network.mail.local
mail.spamdomain.example REJECT blocked by hostname.mail.local
By providing separate strings for different block methods, we can display them separately:
- Blocked single IP: blocked by ip.mail.local
- Blocked whole network/range: blocked by network.mail.local
- Blocked a specific hostname: blocked by hostname.mail.local
Attention: By providing detailed information (like blocked by network.mail.local), you give spammers a hint to the setup of your list and maybe enough information to bypass your blacklist in the future.
It is still a good idea to give an email admin enough information (mail.local), why your server has blocked emails from his/her server.
Munin Postfix RBL Blocked Emails Plugin
First of all, you need to set up the postfix-rbl-blocked-mails Munin plugin. If you are already using some public blacklist (RBL), you will see results.
As there is no configuration file for this plugin, we have to change the plugin by itself. You can find the corresponding file in:
Debian Based Systems (including Ubuntu) has the file in /etc/munin/plugins/postfix_rbl_blocked_mails which is a symlink to /usr/share/munin/plugins/postfix_rbl_blocked_mails. If there is no such file or your Linux distribution has no corresponding package, follow the installation described below. You can skip this step if you have found the file in /etc/munin/plugins/ or a symlink to the file.
Installation of Munin Postfix RBL Blocked Emails Plugin
If there is no file, please get it from munin-monitoring Github repository.
You can drop the in your /etc/munin/plugins/ folder and make it executable. A better solution is to put this file in /usr/share/munin/plugins/ folder and create a symlink in /etc/munin/plugins/ to enable the monitoring of blocked email connections by RBL lists:
cd /usr/share/munin/plugins/
wget https://raw.githubusercontent.com/munin-monitoring/contrib/master/plugins/postfix/postfix-rbl-blocked-mails
chmod 755 postfix-rbl-blocked-mails
cd /etc/munin/plugins/
ln -s /usr/share/munin/plugins/postfix-rbl-blocked-mails postfix-rbl-blocked-mails
 /etc/init.d/munin reload
 /etc/init.d/munin-node reload
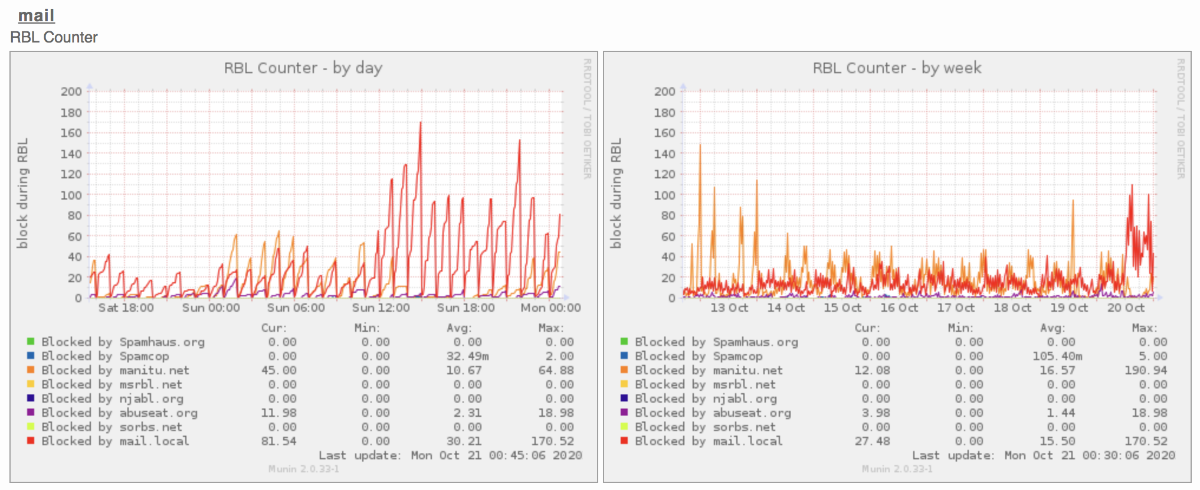
Display all hits in one graph
To display the results of all hits in one line of the graph, we need to add a corresponding entry. This entry will evaluate for mail.local hits.
As there are many distributions or running setups with older plugin versions and newer installation will be with a more recent version, we will explain the configuration (code change) for both.
Version from 2019 (current in February 2021)
As the current version of this plugin was simplified, we need to add our entry to the variable RBLS and restart munin-node. The file should look something like this:
#!/bin/sh
#
# Made by Stefan Bühler, Switzerland
# Monitor blocked Mails during Postfix RBL Scan, included Spamhaus, Spamcop, Manitu, MSRBL, NJABL

# Allow user to specify logfile through env.logfile
LOGFILE=${logfile:-/var/log/mail.log}
DATE=$(date '+%b %e %H')
RBLS=${rbls:-spamhaus.org spamcop.net manitu.net msrbl.net njabl.org mail.local}

...
Just append mail.local at the end of the list, separated by a space from the previous entry.
Version from 2018
Before simplifying this file, the plugin was slightly different and required two changes to add another list. You version might look like this (see also at Github):
#!/bin/sh
#
# Made by Stefan Bühler, Switzerland
# Monitor blocked Mails during Postfix RBL Scan, included Spamhaus, Spamcop, Manitu, MSRBL, NJABL

# Allow user to specify logfile through env.logfile
LOGFILE=${logfile:-/var/log/mail.log}
DATE=$(date '+%b %e %H')


get_blocked_by_domain_count() {
  local escaped_domain
  # escape dots - for a proper regular expression
  escaped_domain=$(echo "$1" | sed 's/\./\\./g')
  grep -c "$DATE.*blocked using [^ ]*${escaped_domain}" "$LOGFILE"
}


if [ "$1" = "autoconf" ]; then
  if [ -r "$LOGFILE" ]; then
    echo yes
  else
    echo "no (log file not found: $LOGFILE)"
  fi
  exit 0
fi

if [ "$1" = "config" ]; then
  echo 'graph_title RBL Counter'
  echo 'graph_category mail'
  echo 'graph_args --base 1000 -l 0'
  echo 'graph_vlabel block during RBL'
  echo 'spamhaus.label Blocked by Spamhaus.org'
  echo 'spamcop.label Blocked by Spamcop'
  echo 'manitu.label Blocked by manitu.net'
  echo 'msrbl.label Blocked by msrbl.net'
  echo 'njabl.label Blocked by njabl.org'
  exit 0
fi


# sbl-xbl.spamhaus.org or zen.spamhaus.org
printf 'spamhaus.value %s\n' "$(get_blocked_by_domain_count "spamhaus.org")"
# bl.spamcop.net
printf 'spamcop.value %s\n' "$(get_blocked_by_domain_count "spamcop.net")"
# ix.dnsbl.manitu.net
printf 'manitu.value %s\n' "$(get_blocked_by_domain_count "manitu.net")"
# combined.rbl.msrbl.net
printf 'msrbl.value %s\n' "$(get_blocked_by_domain_count "msrbl.net")"
# combined.njabl.org
printf 'njabl.value %s\n' "$(get_blocked_by_domain_count "njabl.org")"
To add your mail.local entry, you have to make two changes to this file. First of all, go to the bottom of the file and add your entry below:
...

# mail.local
printf 'local.value %s\n' "$(get_blocked_by_domain_count "mail.local")"
In the second step, take a look for the section where the label names are defined for the different blacklists and add your entry:
...

if [ "$1" = "config" ]; then
  echo 'graph_title RBL Counter'
  echo 'graph_category mail'
  echo 'graph_args --base 1000 -l 0'
  echo 'graph_vlabel block during RBL'
  echo 'spamhaus.label Blocked by Spamhaus.org'
  echo 'spamcop.label Blocked by Spamcop'
  echo 'manitu.label Blocked by manitu.net'
  echo 'msrbl.label Blocked by msrbl.net'
  echo 'njabl.label Blocked by njabl.org'
  echo 'local.label Blocked by mail.local'
  exit 0
fi

...
To display the different possibilities of blocking in separate lines, keep on reading.
Display by blocking type: Host, IP Address, and Networks
The setup to display the different types of blocking (hostname, IP address, or network) requires adding the details for every type.
To make this work, you have to define the different blocking types in your blacklist, as we explained before:
root@server $ cat /etc/postfix/my_blacklist
192.168.42.1           REJECT blocked by ip.mail.local
192.168.43.0/24    REJECT blocked by network.mail.local
mail.spamdomain.example REJECT blocked by hostname.mail.local
Now we can filter by the corresponding type:
- ip.mail.local
- network.mail.local
- hostname.mail.local
Version from 2019 (current in February 2021)
Adding the entries should be pretty simple if you have followed the previous explanation to add them all in one entry. For the current version, this will be:
...

RBLS=${rbls:-spamhaus.org spamcop.net manitu.net msrbl.net njabl.org ip.mail.local network.mail.local hostname.mail.local}

...
If you want to see the whole volume of your local blacklist by your setup in the graph, add mail.local too:
...

RBLS=${rbls:-spamhaus.org spamcop.net manitu.net msrbl.net njabl.org mail.local ip.mail.local network.mail.local hostname.mail.local}

...
Version from 2018
For the previous version from 2018 or before, you have to add the entries in 2 parts of the file:
...

if [ "$1" = "config" ]; then
  echo 'graph_title RBL Counter'
  echo 'graph_category mail'
  echo 'graph_args --base 1000 -l 0'
  echo 'graph_vlabel block during RBL'
  echo 'spamhaus.label Blocked by Spamhaus.org'
  echo 'spamcop.label Blocked by Spamcop'
  echo 'manitu.label Blocked by manitu.net'
  echo 'msrbl.label Blocked by msrbl.net'
  echo 'njabl.label Blocked by njabl.org'
  # added mail.local
  echo 'local.label Blocked by mail.local'
  echo 'localip.label Blocked by ip.mail.local'
  echo 'localnetwork.label Blocked by network.mail.local'
  echo 'localhostname.label Blocked by hostname.mail.local'
  exit 0
fi

...

# mail.local to display overall volume being blocked by local blacklist
printf 'local.value %s\n' "$(get_blocked_by_domain_count "mail.local")"
# ip.mail.local
printf 'localip.value %s\n' "$(get_blocked_by_domain_count "ip.mail.local")"
# network.mail.local
printf 'localnetwork.value %s\n' "$(get_blocked_by_domain_count "network.mail.local")"
# hostname.mail.local
printf 'localhostname.value %s\n' "$(get_blocked_by_domain_count "hostname.mail.local")"
Don’t forget to reload/restart your munin-node and wait a little bit to see the first results, as the graph is updated through cron by runinng munin-cron every 5 minutes.
Summary
We’ve explained how to check whether you have postfix-rbl-blocked-mails Munin plugin on your system and how to get it from Munins’ Github repository in the most up to date version.
In the next step, we’ve explained the most common versions of this plugin and how to customize it for your usage. We did the setup for one entry independent of the blocking type (IP, network, hostname) and a detailed version, where you can also see the different types.
You should have enough knowledge to customize the postfix-rbl-blocked-mails Munin plugin for your use case.
Newsletter
See Also
- Blacklisting Single Hosts, IP Addresses, and even Networks in Postfix
- Whitelisting single Hosts, IP Addresses, and even Networks in Postfix
- Manage Postfix Mail Server Queues like a Pro
- Monitoring Postfix Email Queue and add Push Notifications
- MailMum Project Started